 Download Protocol PDF
Using DNA Barcodes to Identify and Classify Living Things:
IV. Analyze PCR Products by Gel Electrophoresis

Reagents
For each group
- 2% agarose in 1x TBE (hold at 60° C) (~50 mL per gel)
- pBR322/BstNI marker (20 µL per gel) or 100-bp ladder (5 µL per gel)*
- PCR products from Part III*
- SYBR Green DNA stain (10 µL)
- 1x TBE buffer (~300 mL per gel
*Store on ice
Supplies and Equipment
- Container with cracked or crushed ice
- Gel-casting tray and comb
- Gel electrophoresis chamber and power supply
- Latex gloves
- Masking tape
- Microcentrifuge tube rack
- PCR tube rack
- 3 Microcentrifuge tubes (1.5mL)
- Micropipette and tips (1–100 µL)
- Digital camera or photodocumentary system
- Microwave
- UV <!> or LED transilluminator and eye protection
- Water bath for agarose solution (60° C)
- Seal the ends of the gel-casting tray with masking tape, or other method appropriate for the gel electrophoresis chamber used and insert a well-forming comb.
- Pour the 2% agarose solution into the tray to a depth that covers about one-third the height of the comb teeth.
- Allow the agarose gel to completely solidify; this takes approximately 20 minutes.
- Place the gel into the electrophoresis chamber and add just enough 1× TBE buffer to cover the surface of the gel.
- Carefully remove the comb and add additional 1× TBE buffer to fill in the wells and just cover the gel, creating a smooth buffer surface.
- Use a micropipette with a fresh tip to transfer 5 µL of each PCR product (from part III) to a fresh 1.5-mL microcentrifuge tube. Add 2 µL of SYBR Green DNA stain to each tube with 5 µL of PCR product. Do not add SYBR Green directly to the tubes containing the full 25 µL of PCR product from part III; SYBR Green interferes with the sequencing reaction.
- Add 2 µL of SYBR Green DNA stain to 20 µL of pBR322/BstNI marker or 5 µL of 100-bp marker.
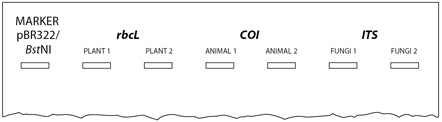
- Orient the gel according to the diagram below, so the wells are along the top of the gel. Use a micropipette with a fresh tip to load 20 μL of pBR322/BstNI size marker or 5 µL of 100-bp marker into the far left well.
- Use a micropipette with a fresh tip to load each sample from Step 6 in your assigned wells, similar to the following diagram:
Expel any air from the tip before loading, and be careful not to push the pipette through the bottom of the sample well.
The samples you load may not be the same as those on the diagram. - Store the remaining 20 µL of your PCR product on ice or at -20° C until you are ready to submit your samples for sequencing.
- Run the gel for approximately 30 minutes at 130V. Adequate separation will have occurred when the cresol red dye front has moved at least 50 mm from the wells.
- View the gel using UV or LED transillumination. Photograph the gel using a digital camera or photodocumentary system.
Avoid pouring an overly thick gel, which makes visualization of the DNA more difficult.
The gel will become cloudy as it solidifies.
Do not add more buffer than necessary. Too much buffer above the gel channels electrical current over the gel, increasing running time.
Transillumination, where the light source is below the gel, increases brightness and contrast.
